What you need to know about Squarespace Form block Settings
Forms are essential for any website, whether you're collecting inquiries, bookings, or newsletter signups. Squarespace offers a powerful built-in Form Block with a variety of useful settings to customize forms for your unique needs.
This post will walk you through notable form settings, explain how to manage form submissions, and, most importantly, show you how to streamline your workflow by creating a single, reusable form block that you can use across your entire website.
Notable Squarespace Form Block Settings
Understanding these key settings can help you create effective forms that serve your specific goals.
Lightbox Form vs Inline Form
You have two main display options for your forms:
Inline Forms are embedded directly onto the page, always visible to the user. This is ideal for contact pages or sections where the form is the primary content.
Lightbox Forms remain hidden until a button is clicked, at which point they pop up over the content. This offers a cleaner page design and is perfect for a call-to-action (CTA) button like "Book a Call" or "Request a Quote."
To enable Lightbox mode, go to your Form block setting - Design - Make sure Lightbox option is enabled
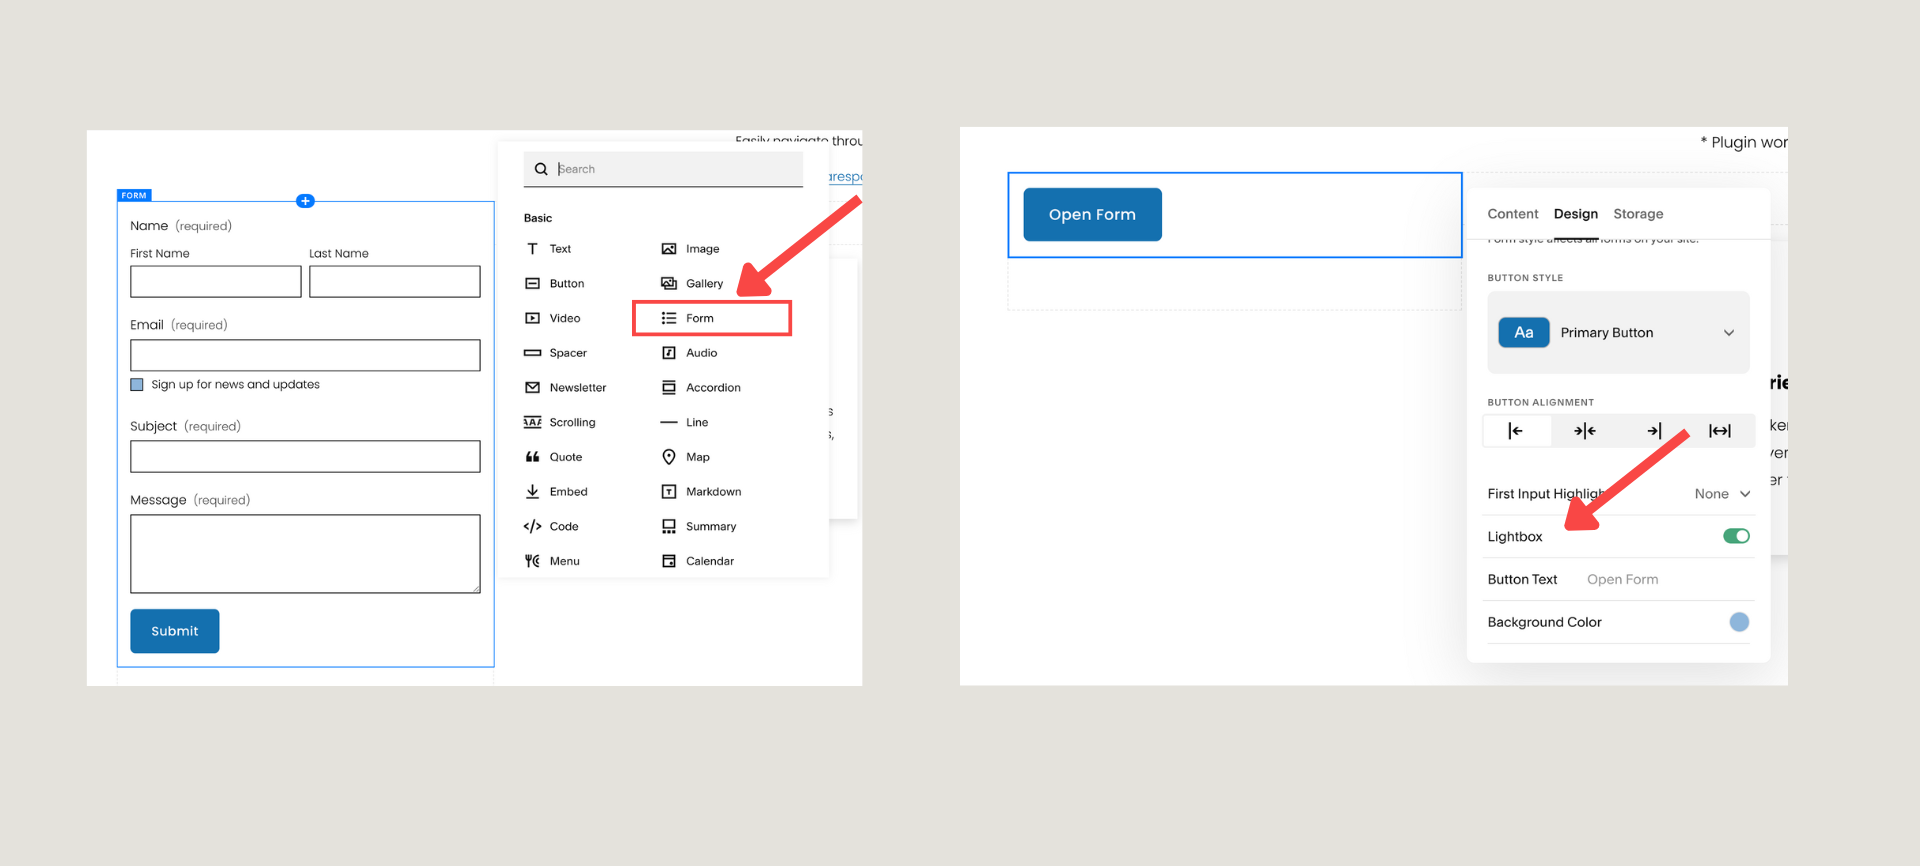
Squarespace lightbox form
Post-Submission Actions
Once a visitor submits a form, you can control what happens next to guide them seamlessly through your site.
Show a Thank You Message: A simple, customizable message confirms to the user that their submission was successful.
Redirect to a Page: This is a powerful feature for funneling users. You can send them to a dedicated "Thank You" page, a booking calendar, a welcome packet, or any other relevant page on your site.
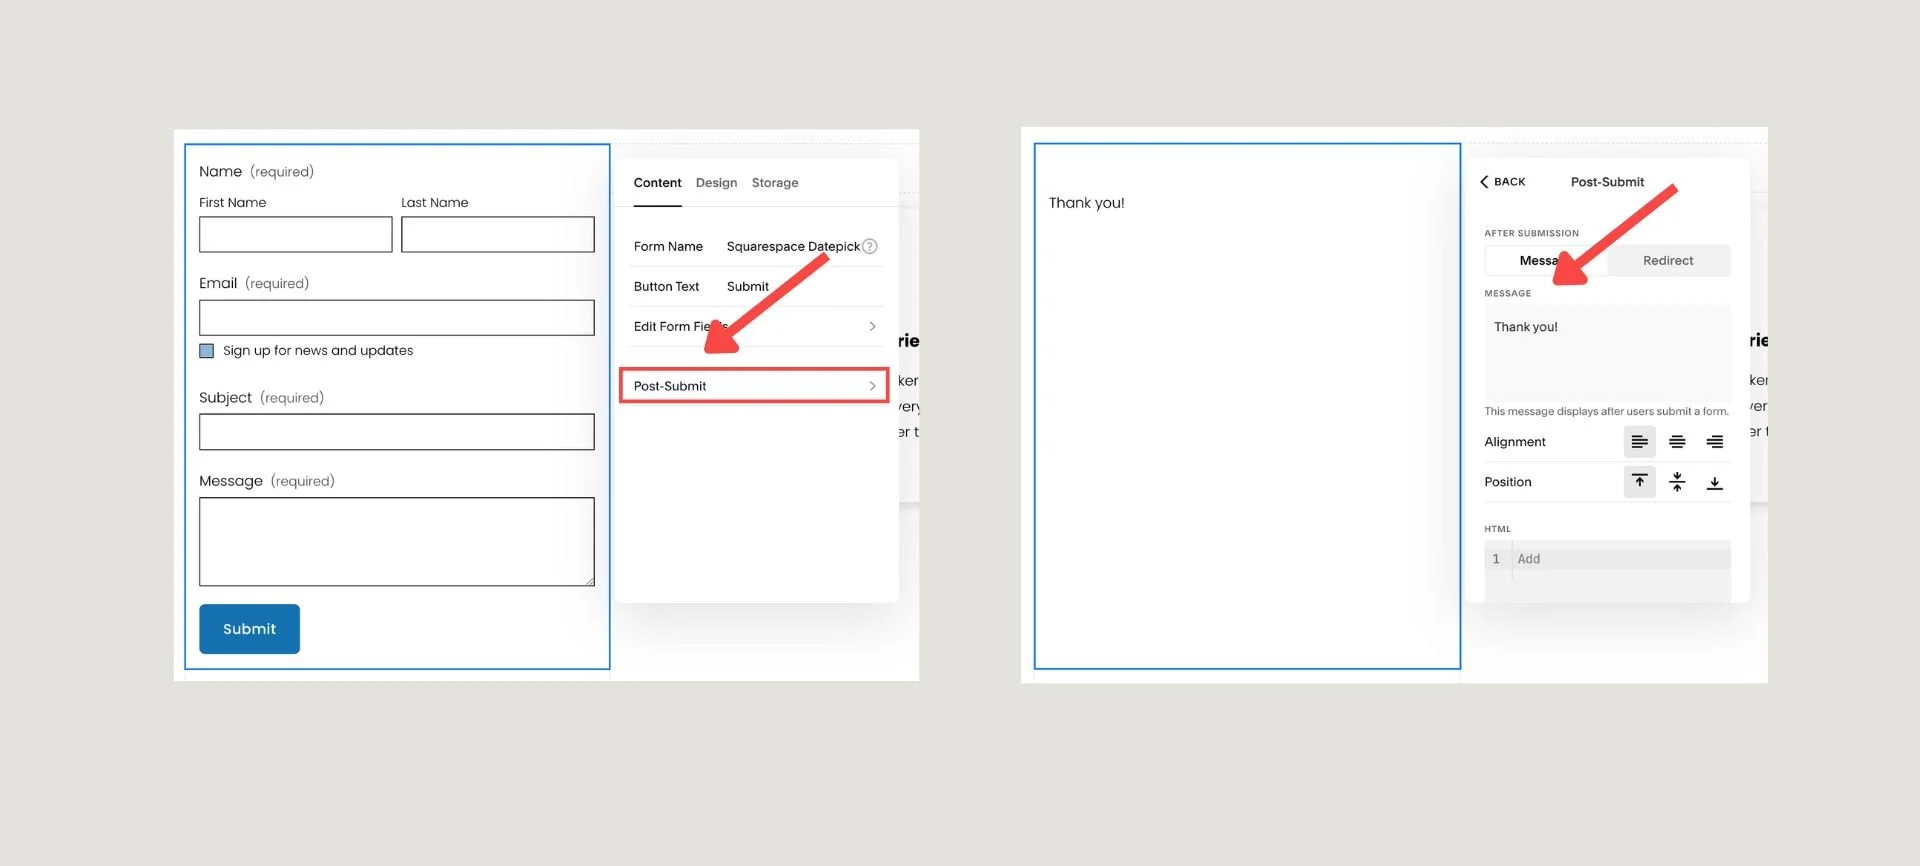
Form block - post-submit
To control the form submission action, go to your Form block setting - Content - Post-submit
Storage and Automation
Squarespace gives you several options for managing your form data:
Email: Form data can be sent directly to one or more email addresses.
Squarespace Contacts: Submissions are automatically stored in your Squarespace Contacts/Profiles, which is essential for managing customer relationships and segmenting audiences.
Third-Party Integrations: Connect your forms to platforms like Mailchimp for email marketing, Google Sheets for data tracking, or Zapier for advanced automation with thousands of other services. You can also enable Google reCAPTCHA to reduce spam.
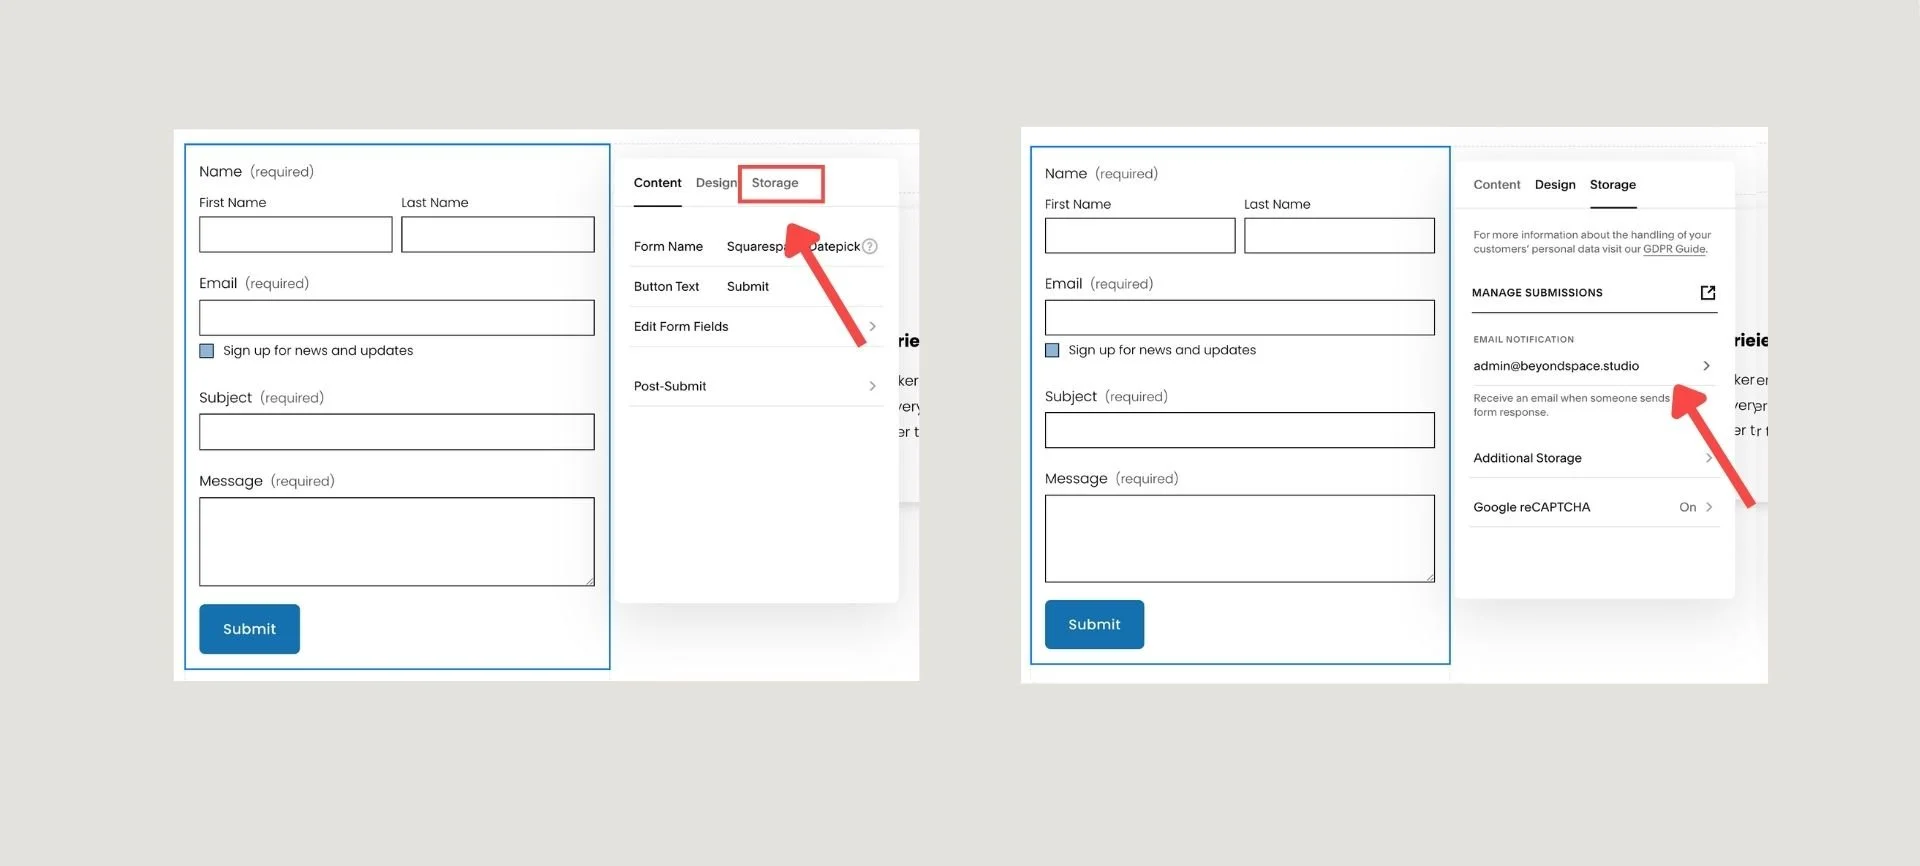
Form block - Storage
Form Fields and Important Field Types
Beyond the default fields (Name, Email, Message), you can customize your forms extensively with a wide range of field types.
Email Field: This is essential for replying to submissions and can also be configured to collect newsletter signups.
Subject Field: A "Subject" field can be created by adding a Text field with the exact label "Subject." The content of this special field will automatically be included in the subject line of the email notification for that form submission, allowing for customized subject lines instead of the default "Form Submission" title.
File Upload Field: Allows visitors to attach documents, resumes, or other files to their submission.
Hidden Field: Hidden fields can be used to track which URL your form traffic originates from.
Datepicker Field: Squarespace's native Date field allows users to select a date. However, for more advanced needs—such as custom date formats, setting lead times, or restricting available dates—you can use the Squarespace Datepicker plugin from Beyondspace.
Pro Tip on Subject Fields: As noted above, the "Subject" field's content will be included in your email notification's subject line. If different users submit the same subject (e.g., "General Inquiry") or your forms do not have a subject field, email clients like Gmail may group these emails together, which can be difficult to manage. For a dedicated solution to ensure each submission has a unique subject line, see our post on this matter.
Form Analytics in Your Dashboard
All form submissions are stored under Contacts or Profiles in your Squarespace backend. There’s also a “Form Submitters” list (released mid-2023) showing recent submissions, detailed contact info, and tags. You can track form performance under Analytics - Engagement in the Buttons & Conversions section.
Newsletter Block vs Form Block
While similar, Newsletter Blocks are more limited and designed specifically for email list signups. For robust inquiry/basic form needs, the Form Block is more flexible and feature-rich.
Make Your Forms Reusable Across Your Site
One of the biggest challenges with Squarespace forms is that each one exists independently on the page where it’s created. Even if you use a Saved Section or copy-and-paste a form that looks identical, the engine behind it is not. The new form is treated as a completely separate entity in Squarespace's backend. While the original form might be named "Inquiry Form," its identical-looking copy is automatically renamed "Inquiry Form 1." All storage and connections are reset to the default, and data entered into this new form is routed to a separate submissions database. This makes consolidated analytics and management nearly impossible.
The Synced Blocks plugin from Beyondspace solves the problem of manual replication by letting you create a single, reusable form block. This approach offers two major benefits:
Saved Time & Effort: Your form settings persist in one global form—no need to redo titles, fields, post-submit messages or reconnect storage on each page.
Streamlined Analytics: All form submissions roll up neatly under the same form name, making it easy to analyze which pages convert best.
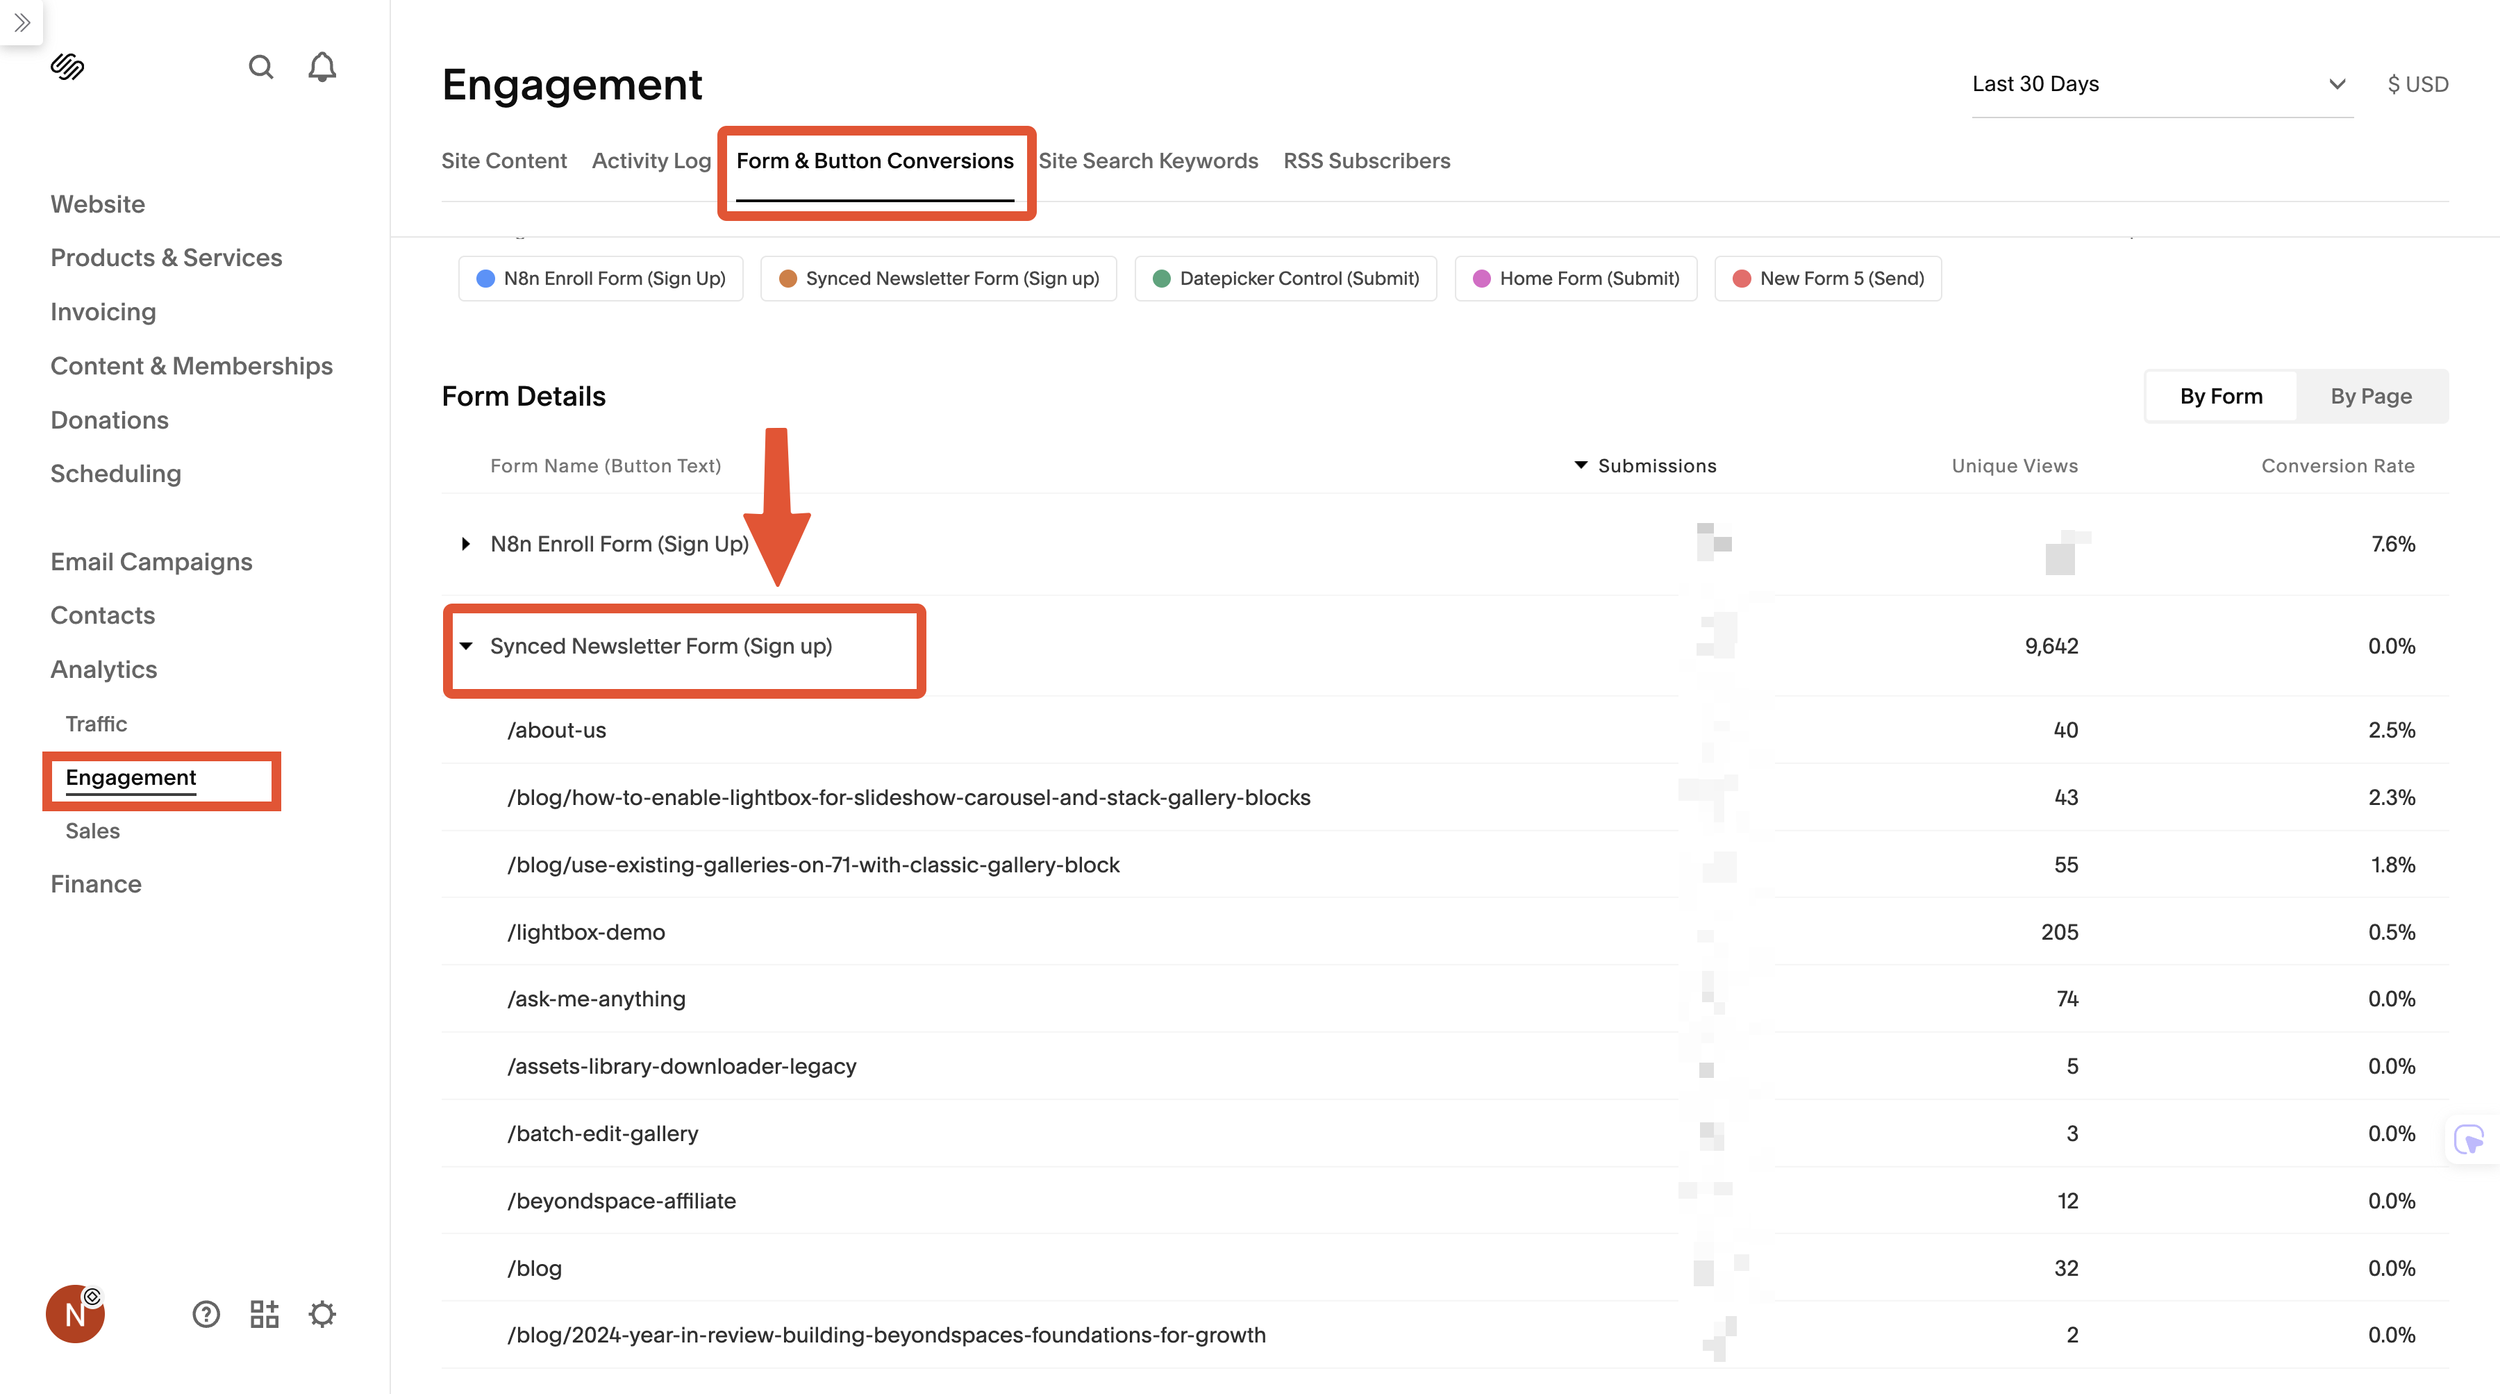
In the screenshot below, you can see how all submissions for our single "Synced Newsletter Form (Sign Up)" are neatly rolled up into one place. This gives you a quick, at-a-glance overview of its performance across your entire website.
When you click on the form name, the analytics dashboard then allows you to view performance By Page. As the next column show, you can easily see the number of submissions and the conversion rate for that form on every single page where it is placed.
This gives you a similar analytics result to placing a single form block in your website's footer, but with the added flexibility of being able to place your form anywhere on the page, providing granular insights into your content's performance.
Consolidated Form analytics
The plugin implements this by saving the form’s content in a dedicated “Reusables” blog collection and using Summary Blocks to display the synced form on any page.
Step-By-Step: Creating a Reusable Form Block Using Synced Blocks
In Squarespace, create a blog collection named Reusables (or similar) to store reusable blocks.
Add a new blog post in this collection and insert your fully configured Form Block or Newsletter Block into this post.
Use the Synced Blocks plugin’s Sync Content button to tag the form as reusable.
On any page where you want the form to appear, add a Summary Block linked to the Reusables collection, filtering by the tag associated with your form.
Now, any update you make to the form in the original Reusables post instantly updates all synced forms on the site every time you use Sync Content button
This approach drastically reduces maintenance time, keeps your form experience consistent, and streamlines data tracking. These steps above are specifically for creating Form & Newsletter blocks. For a complete, comprehensive guide on creating and managing any type of reusable content with Synced Blocks in Squarespace, please refer to our general tutorial.
By leveraging Squarespace's powerful native form features combined with Beyondspace's Synced Blocks plugin, you can craft engaging, professional form experiences that serve both site visitors and your administrative needs efficiently.